LinPsk supports two modes:
On the first start Linpsk is in demomode.You can run the demomode even without a soundcard installed.
Starting LinPsk you'll get the following window:

The File Menu consists of following items

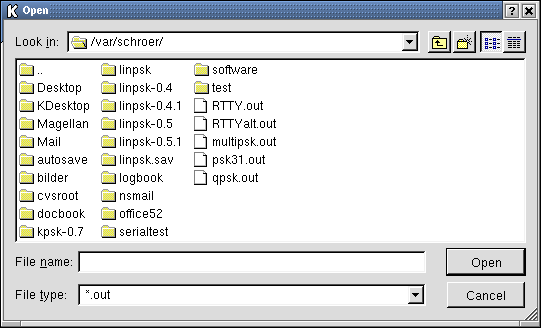
You can select a file for running different demos. Depending on the type of file you choosed in your setup the selection is restricted to the resulting file type.

Terminates the program
The settings menu contains the following items

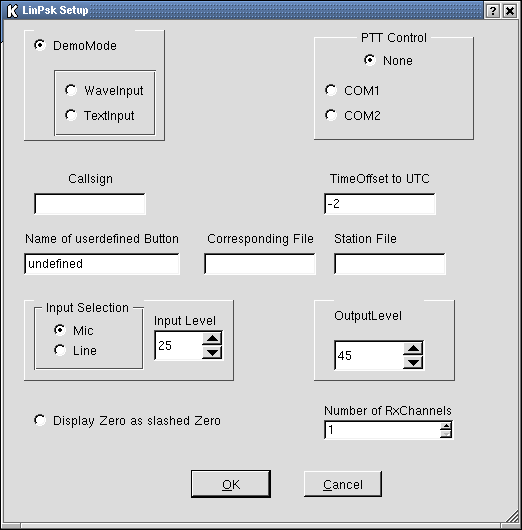
Selecting Settings results in the following window

Here you decide whether to use LinPsk in Demomode or not.
In Demomode you can choose an input file to play with in the File menu Two different modes are supported
The distribution contains two textfiles
These files contain demosample computed with the software made by w5xd.
Having clicked the RX - button you should read
Hello World
in the RX- window , if you selected the bpsk.out file and
cq cq cq de DL1KSV
if you selected the qpsk.out file.
At the same time the RX on the button changes to TX.
Because of the size of the files the distribution doesn't contain wav -files. But you can download some samples from my homepage.
The files were sampled with the rec program and contain a short part of real qso's
You can try the impacts of the different buttons in the demo mode.
Enter your callsign. You can use it in different macros.Some macros won't work without a callsign set.
You can name a button named ' user defined button' as you like.If you are in TX- Mode pushing this button the content of the file you entered in Corresponding file will be sent.. Pushing this button in RX mode will have no effect.
Here you define the name of the file that should be transmitted when you press the user defined button. If this file doesn't reside in your home directory you have to enter the filename including the absolute path.
Select the input device (mic or line) depending on your installation.
Select the input level. Don't overdrive the soundcard input!
Have a close look to the spectrum display. If the plot changes to red then the level is too high. You can control the level using a common mixer program or the Input Level control.
Sselect the outputlevel carefully !
You should set the outputlevel as low as the ALC of your transmitter doesn't respond .
Setting output level too high will cause a broadband signal with much splatter instead of narrow band signal!!!!!!!!!!!.
You can select whether a zero is be displayed with or without a slash.This option only influences how a zero is displayed. A zero will be transmitted as character 0 in any case.
LinPSk tries to detect the usable com ports for switch RX/TX mode of your transmitter. Select the one you use to control your transmitter.Linpsk drives the RTS/DTR pins.
Insert the offset from UTC to the time you use for your computer clock.
Insert the name of the file that contains your station description. If the file doesn't reside in your home directory enter the name including the absolute path.
Of course you can enter different contents in this file, too.
Here you select ( up to to 4) the number of channels you wish to receive simultaneuosly. How many channels work properly depends on your processor power. Due to a bug changing the number of rx channels leads to a wrong display. Don't be confused . Save the settings and restart LinPsk.
Selecting fonts settings you reach the following menu

Independently you can choose the fonts for the different rx windows and the tx - window. For both submenus you get the same looking window.

Make the selection of your choise.
Selecting Colour settings you'll get a submenu where you can select a colour settings menu for each rx- window depending on the numbers of rx channels you've choosen.
The colour you've choosen is used for the window heading , the display text and button text in the select window menu.
The colour settings menu looks like the following

Make the selection of your choise.
To simplify qso'ing you can define macros.
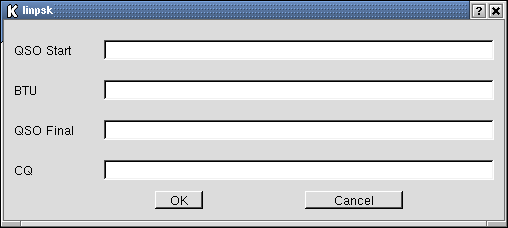
Selecting Edit Macros you'll get the following window:

Here you can define or change Macros.
Beside plain text you can use variables in the text. Using these variables in a macro causes in replacing the variables by their actual values.
The variables are:
The callsign as defined in the setup.
The content of the Their Call box. You can change its content by edititing the box by hand or by double clicking in front of a callsign in the receive window.
The name of the remote op as defined in the Name field
This variable will be replaced by "de @CALLSIGN@ kn" and be sent in cw.
Here are some examples for macro definition:
This will save your actual configuration to a file named LinPsk.config, which will be loaded every time you start LinPsk.
The Linpsk.config file is located in your home directory. There are a few paramters that can only be modified by editing this config file. These paramters are:
Defines the minimum width of the LinPsk main window, default width is 640.
Defines the minimum height of the LinPsk main window, default height is 540.
Height of the statusbar. Default height is 20
For each RX window a trigger text may be defined independently. If the trigger is activated and the defined text is detected in the text just received you'll get a beep and the window will be the active RX window.The trigger itself will be deactivated by this action.
This feature for instance gives the oportunity to read a running qso while waiting for a cq call.
You can select the RX - frequency by directly entering the frequecny in the frequency box by clicking the up and down arrows of the frequency box or by directly clicking on the signal in the spectrum display.
If you activate AFC (Automatic Frequency Control), the frequency will be adjusted to the center of the PSK signal. AFC works in a range of about 50Hz around the signal.
At the moment AFC doesn't work for RTTY:
Select the mode of operation you intend to work on. The mode is set independently for each RX window.
In one window you can listen to an psk qso meanwhile in the other you're listening to RTTY.
Receiving in RX mode you may see a <F> This means that the followings displayed character had a framing error.
Activating this feature, up from now the text, received in this window, will be written to a file named Rx_Debug_x. x ranges form 0 to 3 and corresponds to windownumber -1 .
The squelch control is used to set a threshold to inhibit signal reception beyond a specified level. The colour of the squelch bar changes from blue to yellow if the squelch opens.
To change the squelch level simply click into the control.
You can select the TX frequency in the same way you select the RX frequency. If you've activated NET the TX frequency will be the same as the RX frequency. The X frequency will be adjusted, when you change from RX to TX mode.
The RX/TX button is a toggle button. It's label describes what happens if you press the button. If LinPsk starts, the button is labeld with RX. This ensures that the first possible operation is to listen on the band.
Pressing the button the label changes to TX signaling the next possible operation is to transmit.
This control lets you select the active RX window. If you change from RX to TX, the TX operation always uses the parameters (mode of operation, etc.) of the active RX- window.
The spectrum display and the included phase display are the main tuning aid. You can choose a direct frequency representation or the waterfall representation.
You select the appropriate mode by clicking the tab bar.
In the waterfall a stronger amplitude results in a brighter colour.As time goes on each horizontal frequency sample line shifts down and the new one is placed on top.This gives the appearance of an waterfall.
Normally the spectrum reaches from 100 Hz to 2200 Hz. Changing the endpoints of the spectrum zooms the display.
By clicking into the display you can select the frequency of the active RX window.
If you overdrive your soundcard the colour of the spectrum turns to red.
Pressing Tune you 'll send a steady carrier. With the output control in the settings menu you can adjust the output level. Don't overdrive your transmitter.The ALC of your transmitter shouldn't respond.
Pressing this button sends "de @CALLSIGN@ pse k" in CW.
Clears the content of active RX - Window
Clears the contents of the QSO - Info fields
Here you can fill in some QSO - Infos. These are used in some macros
The callsign of the remote station. You can enter it by clicking into this field and typing the callsign on the keyboard or you doubleclick in the active RX - window in front of the callsign and it will be copied in this field
Click into this field and enter the remote op's name by the keyboard
The contents of the macros will be defined in the Edit Macros section of the setup menu
Only works in RX mode and switches to TX mode, sends the start macro and switches back to RX mode
Only works in TX mode. Sends the BTU macro and switches back to RX mode.
Works in RX and in TX mode. If you're in RX- Mode it switches into TX mode , send the Final macro and switches to RX mode|p> In TX mode the Final macro text is sent and then the mode switches to RX mode.
Only works in RX mode. It is switched to TX mode, the cq macro is sent and then switched back to RX mode.
This only works in TX mode. In TX mode the content of the station file is send. The macro variables won't be evaluated at the monment.
If you defined this button in the setup menu, the content of the correspondig file will be sent, if you're in TX mode. In RX mode nothing happens.
The macro variables won't be evaluated at the monment.
Personally I use a file to introduce myself.